
April 7, 2025
Written by

前置き
このコラムではVerseだけではなくControl Rigやその他の機能を使い、特殊なシステムの構築方法を紹介します。
UEFNにおいてはシステムといえばVerseというイメージが付きがちですが、特殊な実装になるとVerseだけでは扱えない場合があります。
例えば
1、3は完璧を求めなければ実装はできるものですが、Verseだけを使うとやはりTickの制限から実用レベルでは厳しいものになっていると思います。
2に関してはもはやVerseにそのようなAPIが用意されていません。
(シーングラフにはレイキャストあるが実験的機能のためマップのリリースは不可。)
しかしVerseだけでなく、Verseと一緒に他の機能を使うことで様々な実装が可能になっていきます。
1と2はControl Rig、3はマテリアル関数 or Niagara+マテリアル のどちらかで実装できるものとなっています。
今回はControl Rigにフォーカスして解説していきます。
作成するもの
最終結果…
Control Rig…
Verseコード…
using { /Fortnite.com/Devices }
using { /Verse.org/Simulation }
using { /Fortnite.com/Characters }
using { /UnrealEngine.com/Temporary/Diagnostics }


PlayerProp := class(creative_device):

    @editable
    FollowProp : creative_prop = creative_prop{}

    OnBegin<override>()<suspends>:void=
        if(Player := GetPlayspace().GetPlayers()[0]):
            FollowToPlayer(Player)


    FollowToPlayer(Agent:agent)<suspends>:void=
        loop:
            if(Player := Agent.GetFortCharacter[]):
                FollowProp.MoveTo(Player.GetTransform(), 0.01)
これらはVerseでPropをMoveToでプレイヤーに追従させ、MoveToの動きをControl Rigで補完するようなものとなっています。
様々な用途で使用可能で、主に私はNPC Spawner Deviceを使わないペットシステム等に利用しています。
Control Rigの基本
Control Rigはオブジェクトの動きを制御するものとなっています。
Control Rigを使うことにより、ゲームの最小単位であるTickごとにオブジェクトの動きを制御できます。
極端な例ですが、ゲーム内で60fps出ているとしてVerseで最大1秒間に行えるTeleportToが30回だとしたらControl Rigでは60回(※)実行できます。
※Control Rigはフレームレート依存なのでfpsが増減すればその限りではありません。
コントロールRigの実装
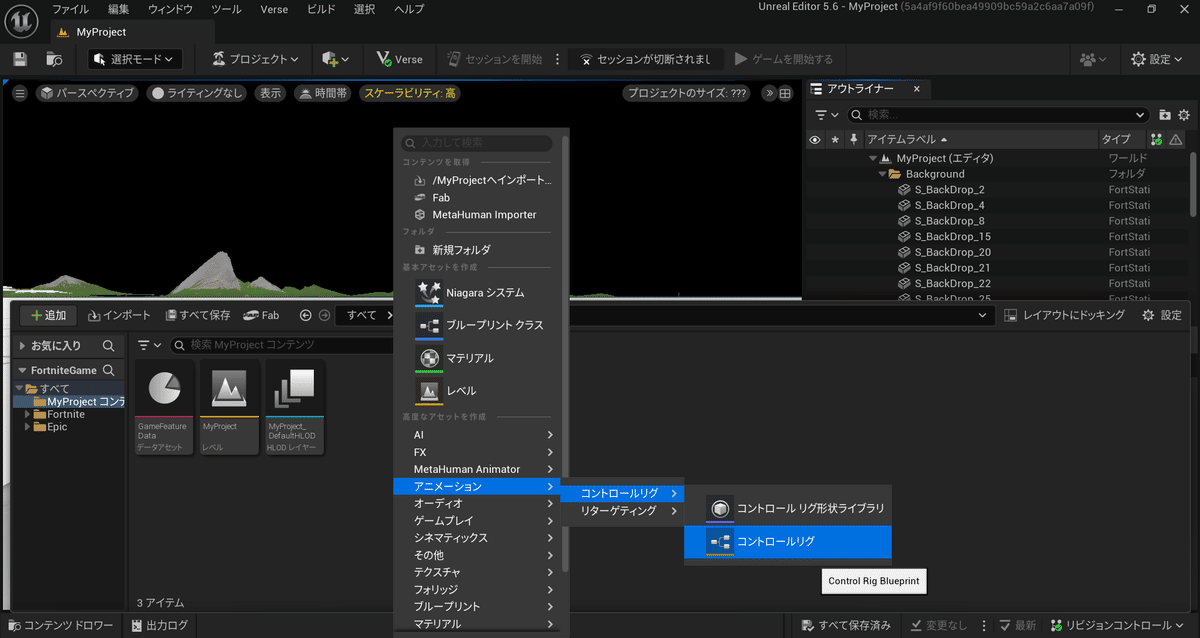
Contorl Rigの作成方法はコンテンツドロワーで右クリックし、
アニメーション → コントロールリグ → コントロールリグ
から作成できます。
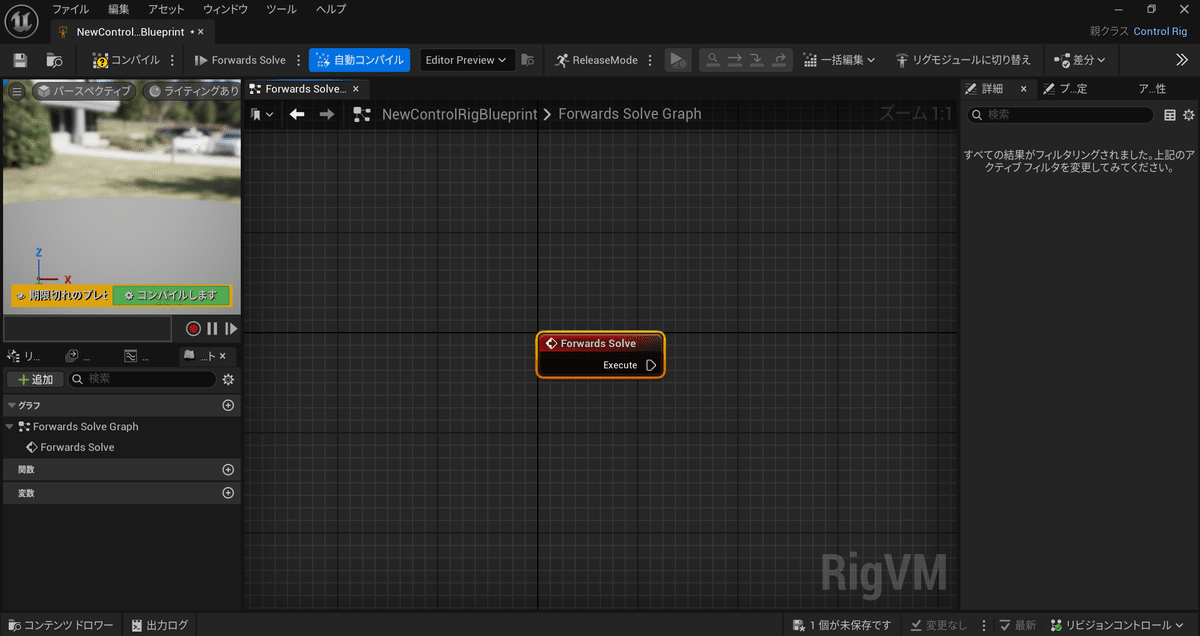
作成後、ダブルクリックでControl Rigを編集できます。
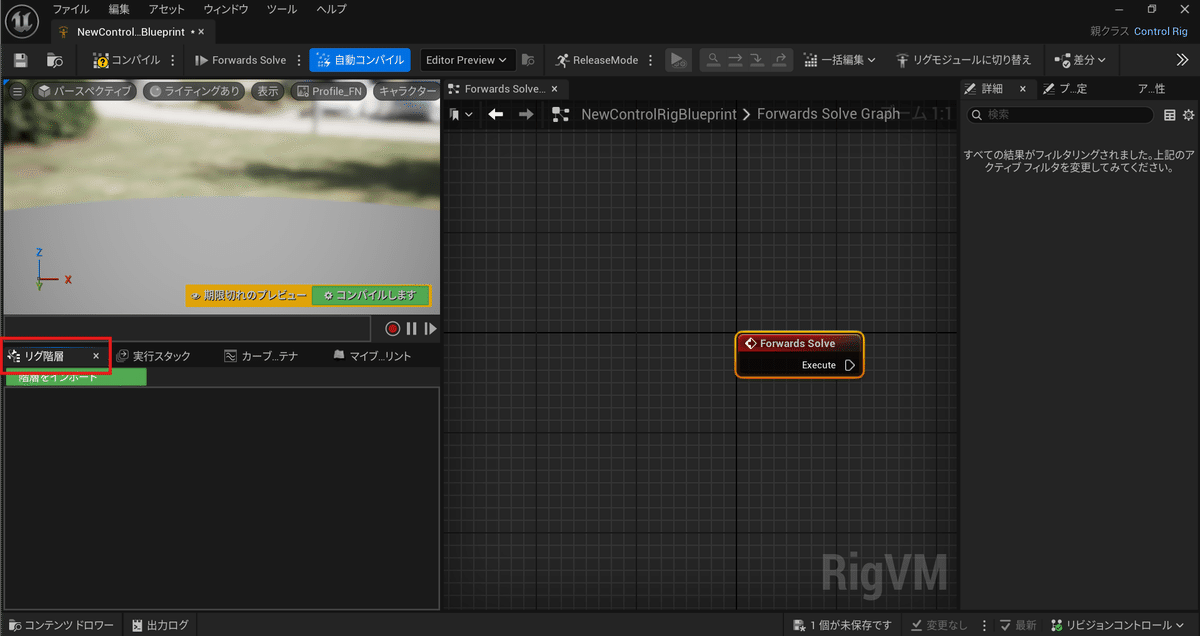
ダブルクリックをすると空のControl Rigが開きます。
Control Rigはノードベースでシステムを組んでいくのでVerseと比べて学習は容易なものとなっています。
動かすためのシステムがあっても、動くものがなければ成立しないので
まずはControl Rigのシステムを作るための下準備をします。
左下のウィンドウ部分から「リグ階層」に移動します。
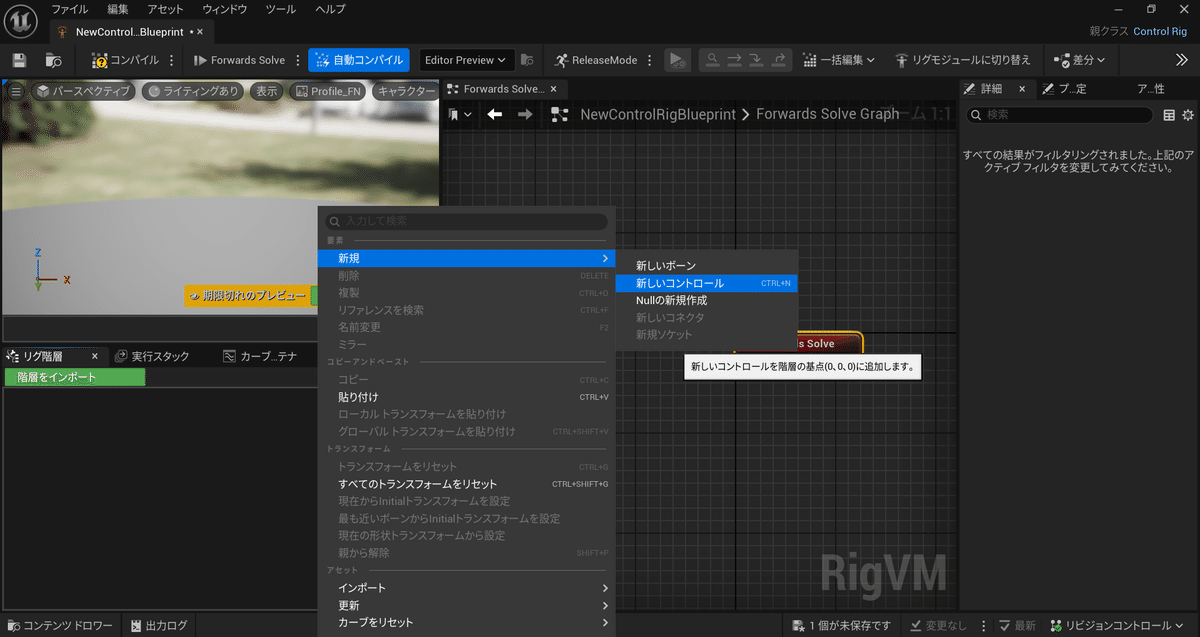
「リグ階層」内で右クリックを押し、
新規 → 新しいコントロール
を2つ追加します。
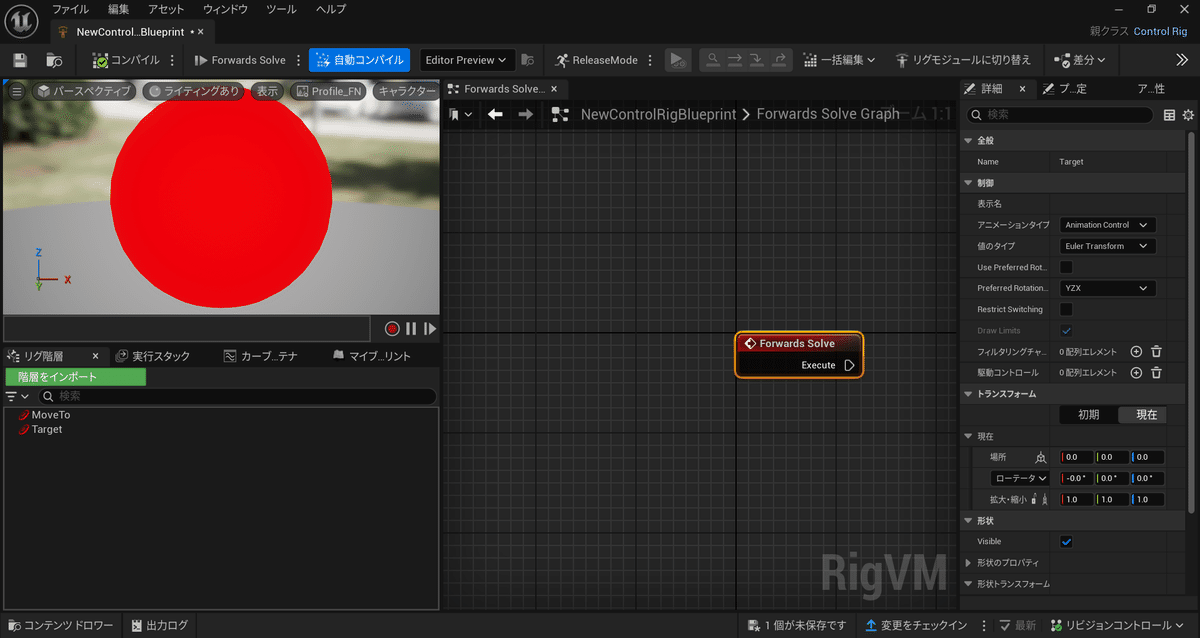
コントロールをそれぞれ「MoveTo」、「Target」という名前に変更します。
下準備ができたので、今回使用するノードを紹介します。
ノードは画面上で右クリックで検索画面が出るのでそこから出せます。

・Forwards Solve
Control Rigがゲーム内に存在している間、Tickごとにトリガーする。
・GetTransform
任意のリグ階層内の物のトランスフォームを取得する。
・SetTransform
任意のリグ階層内の物のトランスフォームを設定する。
・Interpolate
ある値から別の値へ「T」の数値分、変化させる。
Interpolate以外は説明を見ての通り理解できると思います。
Interpolateは(A + B) × Tというような式になります。
A=2 B=0 T= 0.5の時、結果は1になります。
式で考えれば難しいですが、BからAの値に何パーセント(T)変化させるか、のようなイメージで考えてもらえると分かりやすいです。
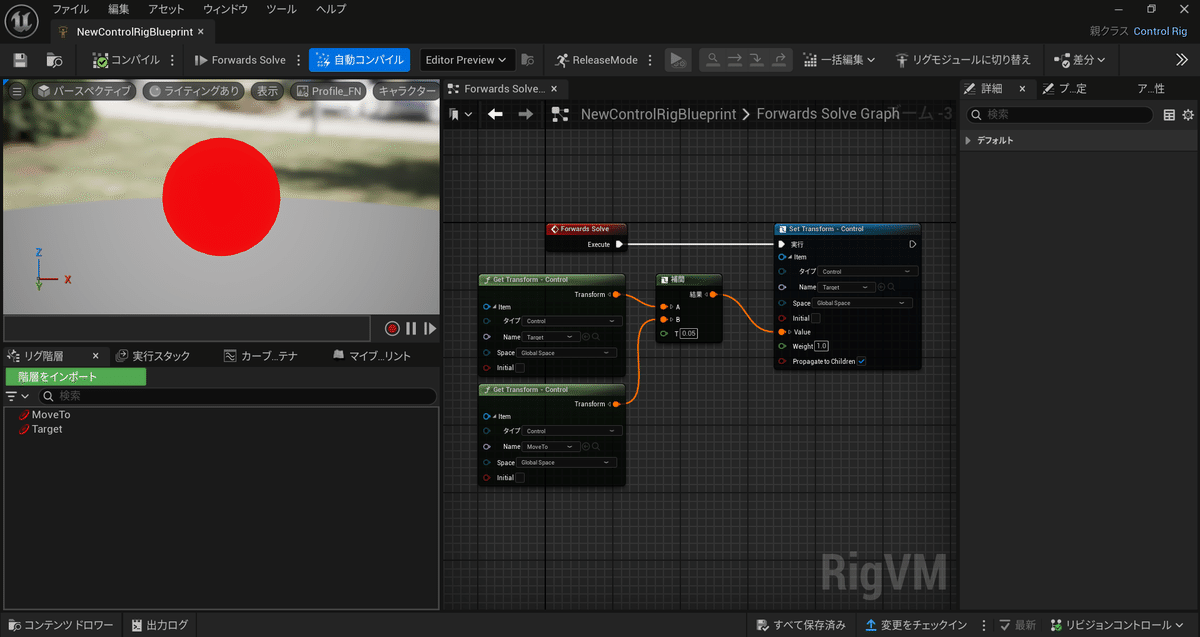
では、MoveToを補完するロジックを作っていきます。
ロジックのフローは以下になります。
ロジックは至ってシンプルでこれのみです。
VerseのMoveToでPropをMoveToするときもほぼ同じような流れですが、ここではControl Rigの実行スピードとInterpolateが肝となります。
ではロジックに沿ってノードを追加していきます。
まずは、
「Forwards Solve」
「GetTransform」×2
「Interpolate」
「SetTransform」
を出します。
次に、各ノードの設定を編集していきます。
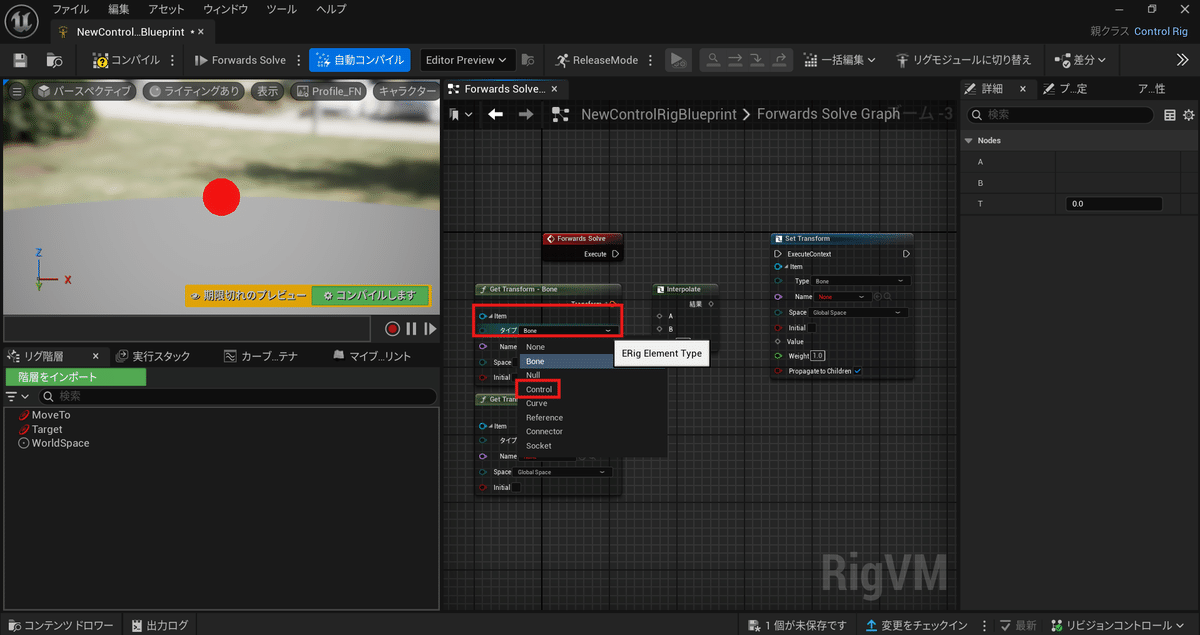
GetTransform、SetTransformの「Item」の項目でどのリグ階層のものを取得するかセットするかを選択できます。
まずはそれぞれのノードすべての
「Item」→ 「タイプ」
を全てControlに設定しておきます。

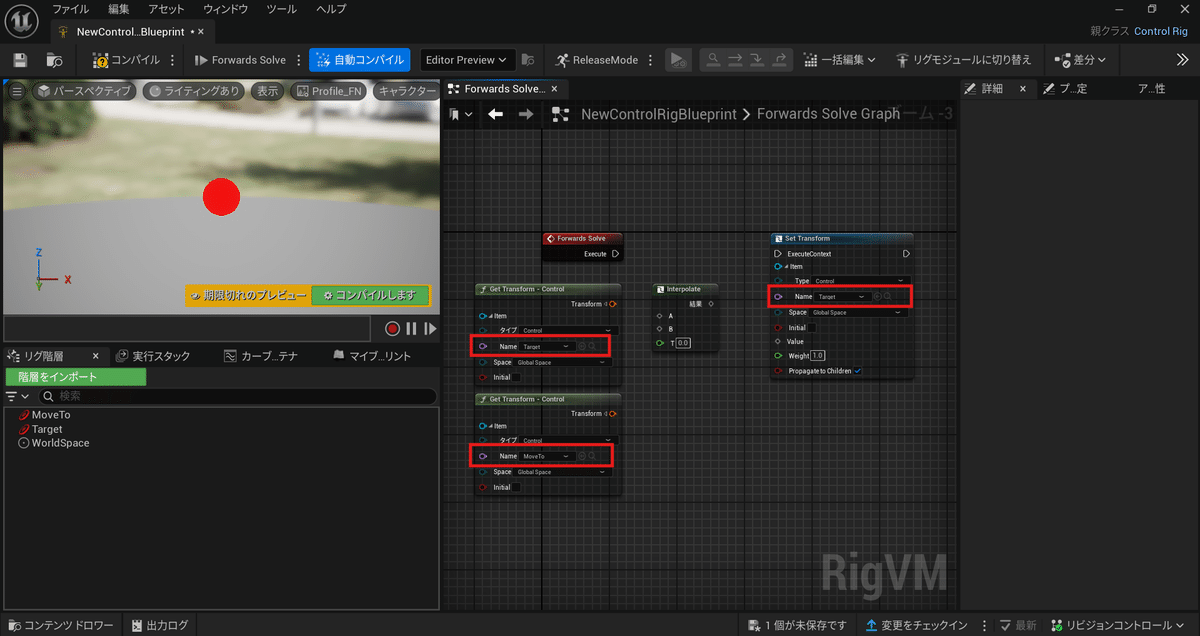
次にそれぞれItemの「Name」の設定を当てはめていきます。
上のGetTransform… Taget
下のGetTransform… MoveTo
SetTransform… Target
にそれぞれ設定します。
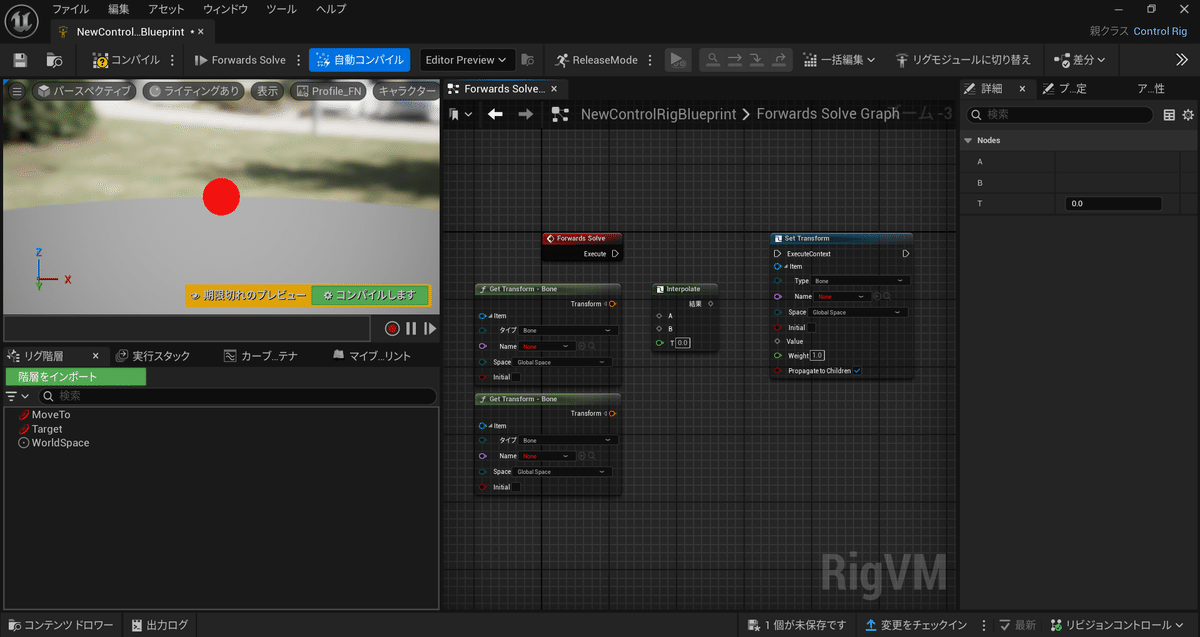
それぞれノードを繋いでいきます。
「Forwards Solve」のExecute → 「SetTransform」のExecuteContent
「TargetのSetTransform」のTransform → InterpolateのA
「MoveToのSetTransform」のTransform → InterpolateのB
「Interpolate」の結果 → 「SetTransform」のValue
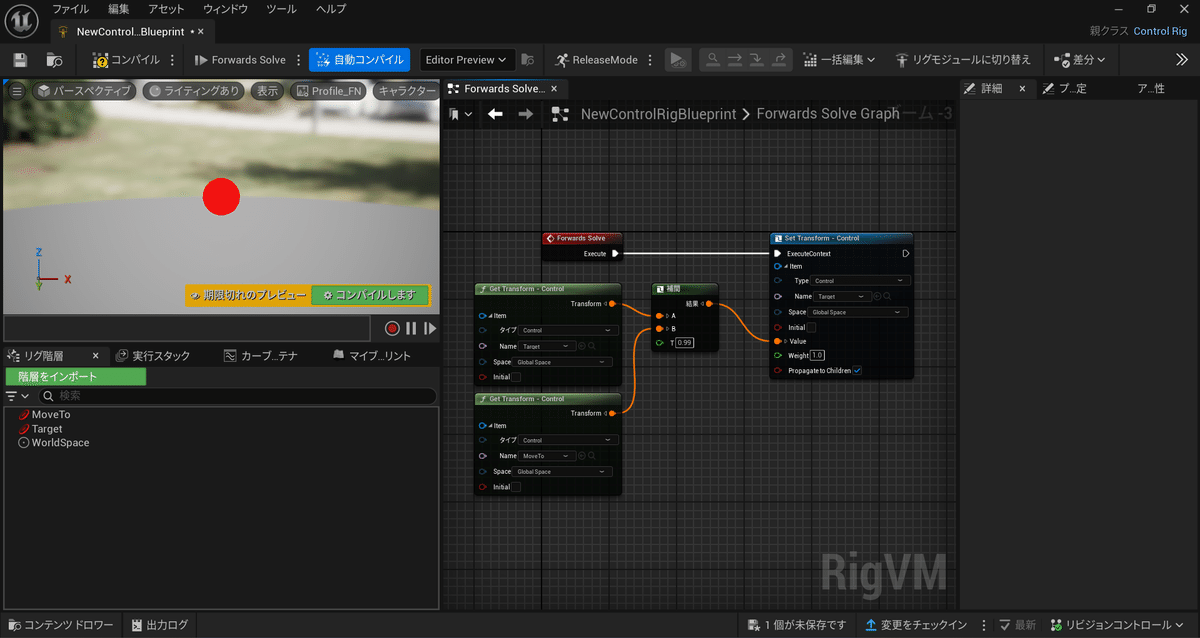
次に、InterpolateのTの値を試しに0.05に設定してみます。
Tの値を編集することでどれだけ遅延して追従するかを設定できます。
設定後、左上のコンパイルを押しMoveToのControlを動かしてみてください
MoveToに遅れてTargetが追従するのがわかると思います
これを使ってMoveToのコントロールをVerseで動かし、Targetを目的のPropに親子付けしていきます。
Rigは実装できましたがこのままではマップの中には読み込めません。
マップで使用するためにはControl RigのコンポーネントがあるBlueprintを作成する必要があります。
コンテンツドロワー → ブループリントクラス → 建築小道具
を作成します。

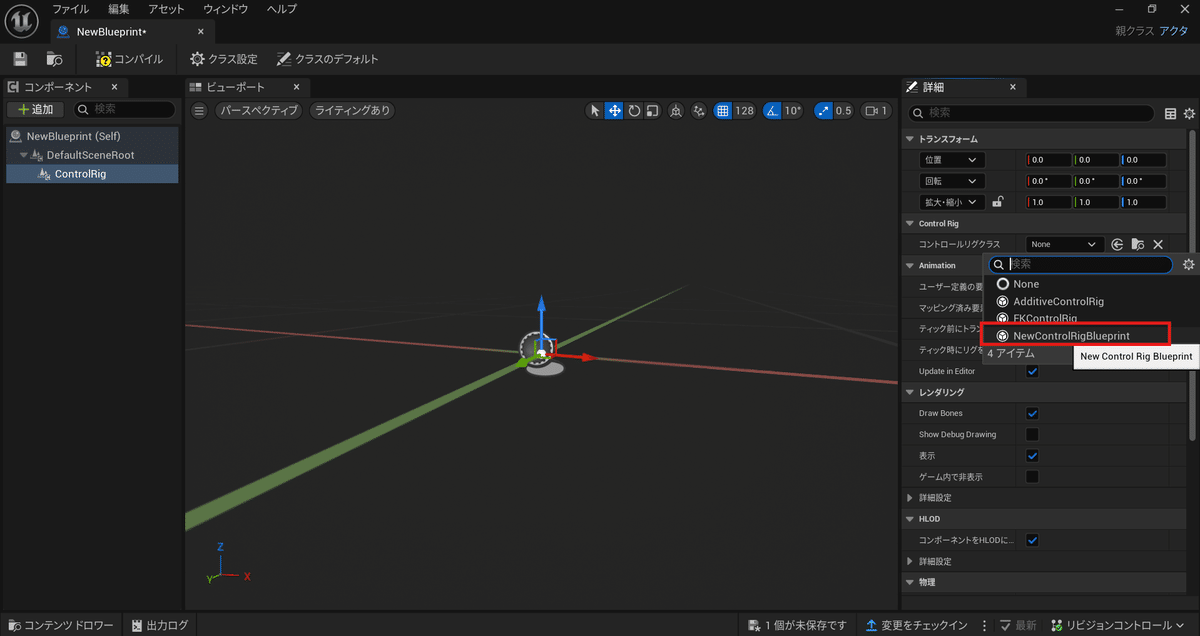
Blueprintを開き、左上の追加から「コントロールリグコンポーネント」を追加します

ControlRig コンポーネントを選択し、「コントロールリグクラス」から先ほど作成したControl Rigを選択します。
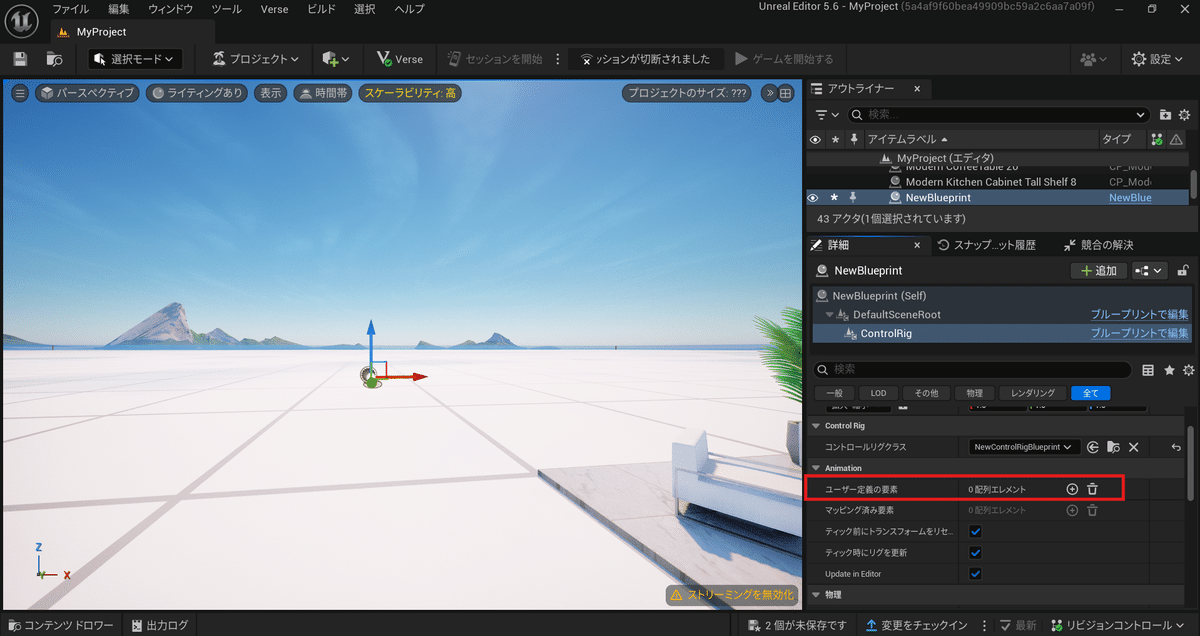
一度マップに戻り、Blueprintを配置しControlRigコンポーネントの
「ユーザー定義の要素」を設定していきます。
これを設定することによってControl Rigで作成したリグ階層のControlを他のアクターに親子付けしたりできます。
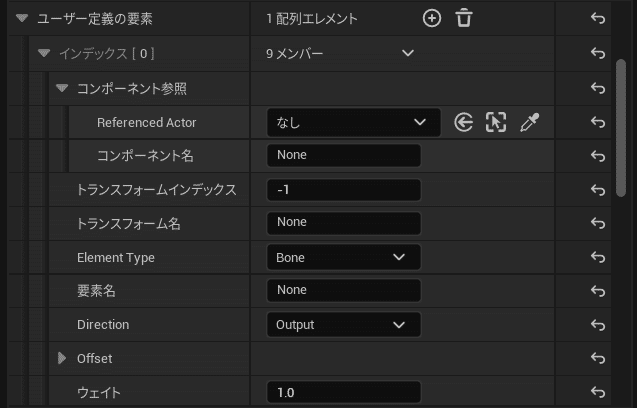
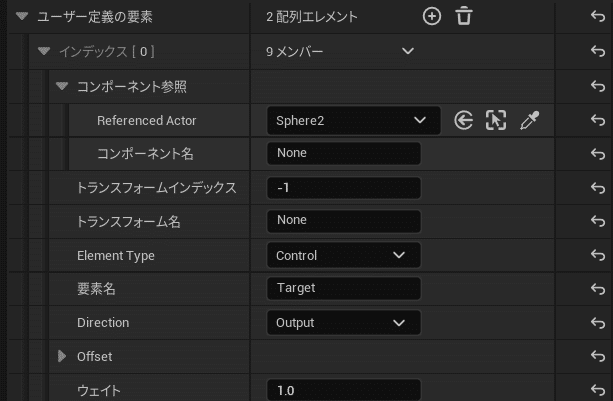
ユーザー定義の要素を+ボタンを押して追加すると、以下のような画面になります。
今回使う項目のみ解説します。
・コンポーネント参照(Referenced Actor)
親子付けする先 / 元のアクター
今回はコンポーネント名についてはNoneで大丈夫です。
・Element Type
設定する要素。今回はControlを選択。
・要素名
リグ階層にあるControlの名前を入力する欄
・Direction
Output / Input のどちらかを選べる。
Outputの場合、コンポーネント参照のアクターがControlの子となる。
Inputの場合、コンポーネント参照のアクターがControlの親となる。
言葉で説明しても分かりづらいので実際に挙動を見ながら解説していきます
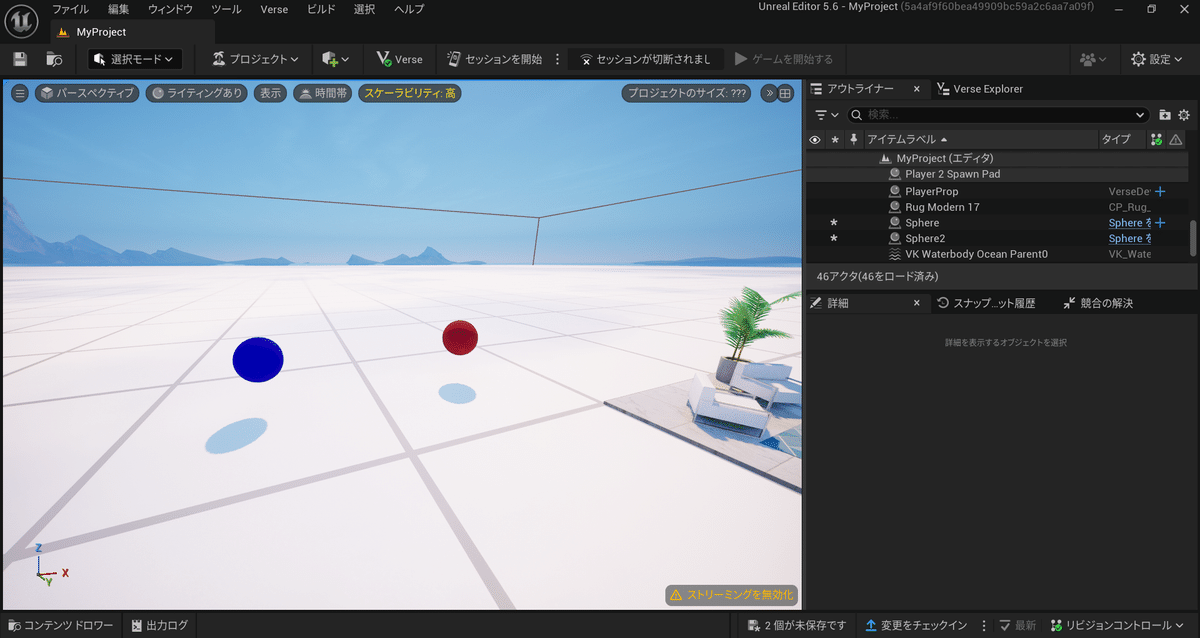
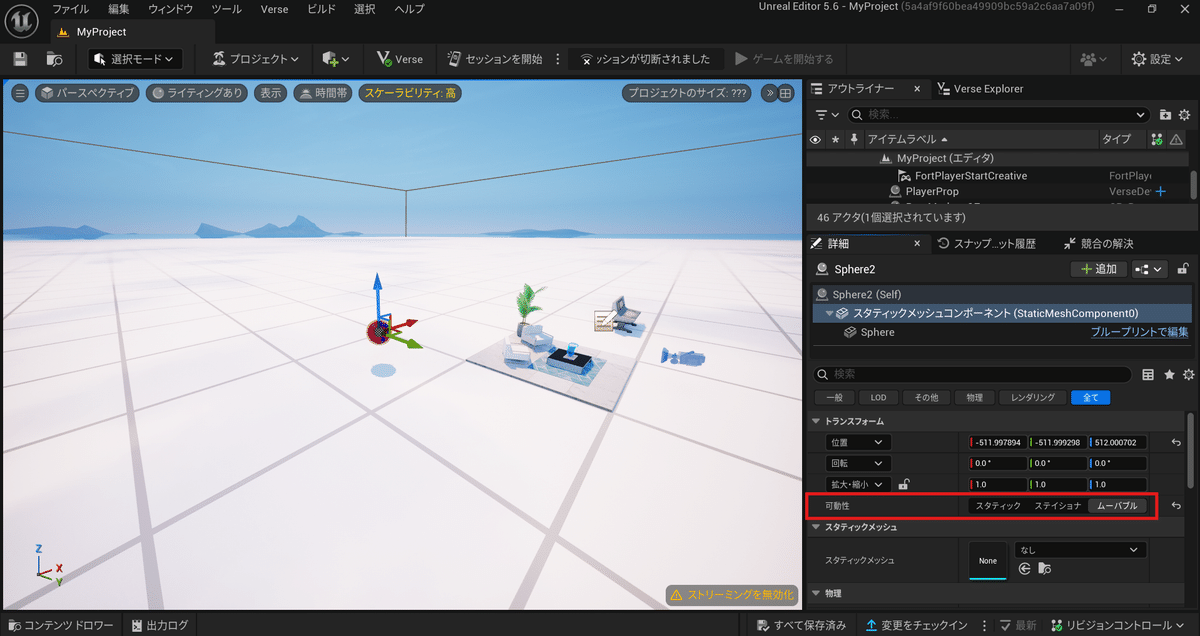
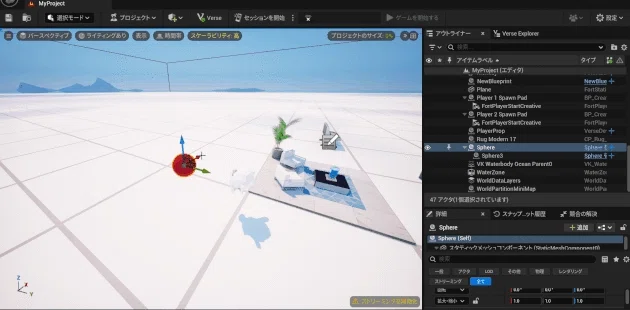
仮で2つの球体の建築小道具BPを準備しました。
青の球体(Sphere2)が赤の球体(Sphere)に追従するように設定してみます。
まずは、今回の場合は以下のように設定していきます。
インデックス0
Referenced Actor… Sphere2(青の球体)
Element Type… Control
要素名… Target
Direction… Output
インデックス1
Referenced Actor… Sphere(赤の球体)
Element Type… Control
要素名… MoveTo
Direction… Input

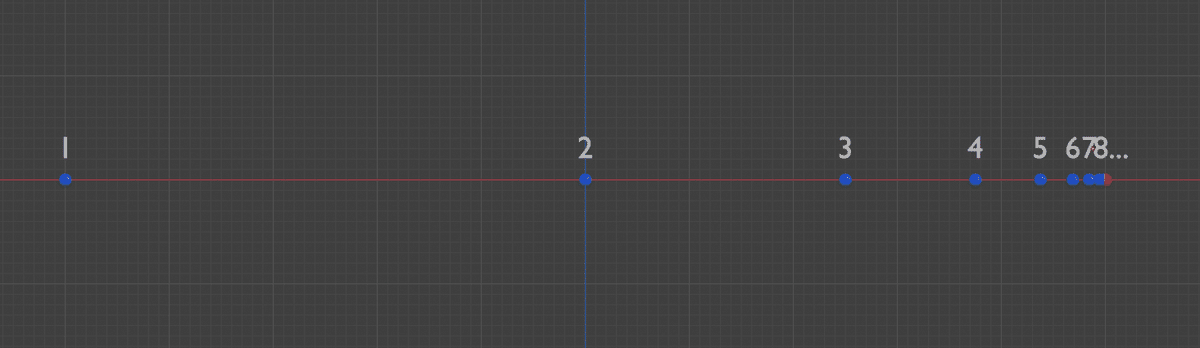
そもそもなぜ補完されるような動きになるのか?これについて解説します
例えば、MoveToが座標0から10に移動するとします。
今回のTの値は0.05です。
Targetは座標0にいますが、時間(ティック)が進むとTargetの座標が
1Tick目
(10(MoveTo) + 0(Target) × 0.05) + 0(Target) = 0.5
2Tick目
(10(MoveTo) + 0.5(Target) × 0.05) + 0.5(Target) = 1.025
3Tick目
(10(MoveTo) + 1.025(Target) × 0.05) + 1.025(Target) = 1.57625
…
という感じで限りなくTargetがMoveToの座標に近づいていくからです。
ちなみに指数関数的に近づいていける距離は短くなっていくので「アキレスと亀」を再現したような形になります
Verseと連携し実装
簡易的ですが今回はVerseコードを用意しました。
常にPlayerにPropをついていくように書いています。
using { /Fortnite.com/Devices }
using { /Verse.org/Simulation }
using { /Fortnite.com/Characters }
using { /UnrealEngine.com/Temporary/Diagnostics }


PlayerProp := class(creative_device):

    @editable
    FollowProp : creative_prop = creative_prop{}

    OnBegin<override>()<suspends>:void=
        if(Player := GetPlayspace().GetPlayers()[0]):
            FollowToPlayer(Player)


    FollowToPlayer(Agent:agent)<suspends>:void=
        loop:
            if(Player := Agent.GetFortCharacter[]):
                FollowProp.MoveTo(Player.GetTransform(), 0.01)
Verseコードをビルドし、デバイスを配置するとFollowPropを定義できると思うのでここにBPでMoveToに設定したSphereを選択しておきます。
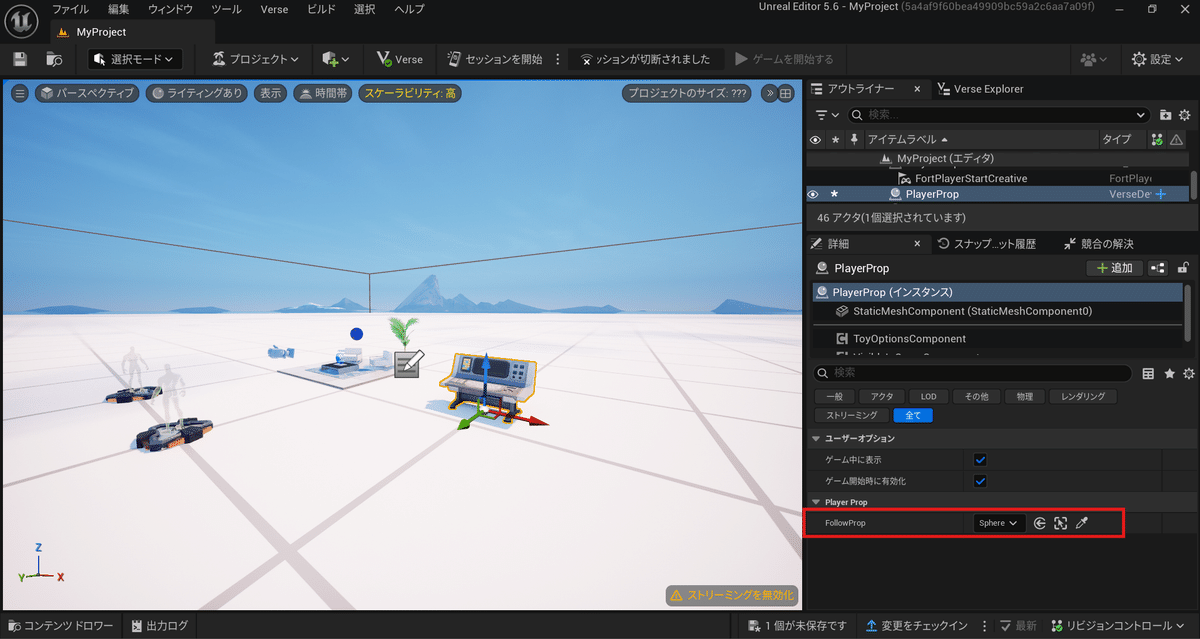
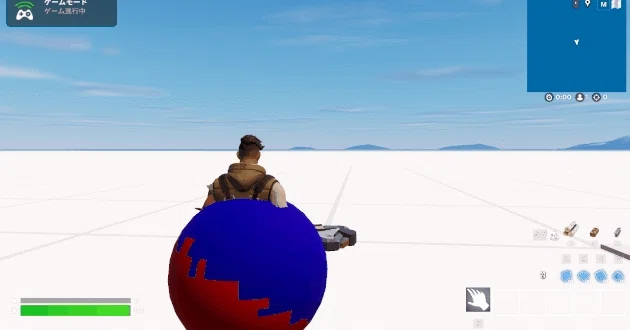
ゲームを開始すると、赤のSphere(Verse制御)に対して青のSphere(Verse+ControlRig制御)が滑らかに追従しているのがわかります。
通常のMoveToで0.33等にしても大まかには綺麗に追従するとは思いますが、ControlRigを使うことで更にこの違和感がない状態まで持っていけます。
今はSphereになってしまっているのと、ペットシステムに改編するとき、プレイヤーと重なるのではなく横にいてほしいので少し工夫をしてみます。
まずはペットの見た目が球体だと分かりづらいと思うので今回はサルの頭のPropに置き換えてみます。
次に、新しくSphereのBPを配置し、赤のSphereに親子付けし横にずらします。
そして赤のSphereと新しく配置したSphereをゲーム上で非表示にします。
ControlRigのBPのTargetのReferenced Actorを新しく配置したサルの頭に設定
ControlRigのBPのMoveToのReferenced Actorを新しく配置したSphereに設定
その後、赤の球の方をサルの頭が見るように新しく配置したSphereを回転して調整します。
これでプレイヤーの横についていくようなペットが完成しました。
In this column, I will introduce methods for building special systems using not only Verse but also Control Rig and other features.
In UEFN, the term “system” is often associated with Verse; however, for more specialized implementations there are cases where Verse alone is not sufficient.
For example:
While implementations 1 and 3 are feasible if you don’t demand perfection, using Verse alone is practically limited by tick restrictions.
As for 2, Verse no longer provides an API for that
(Although the scene graph has raycasting, it is experimental and cannot be used for map releases.).
By using not only Verse but also combining it with other features, various implementations become possible.
Cases 1 and 2 can be implemented with Control Rig, and case 3 can be implemented with either Material Functions or Niagara combined with Materials.
In this article, I will focus on explaining Control Rig.
Final Result:
Control Rig:
Verse Code:
using { /Fortnite.com/Devices }
using { /Verse.org/Simulation }
using { /Fortnite.com/Characters }
using { /UnrealEngine.com/Temporary/Diagnostics }


PlayerProp := class(creative_device):

    @editable
    FollowProp : creative_prop = creative_prop{}

    OnBegin<override>()<suspends>:void=
        if(Player := GetPlayspace().GetPlayers()[0]):
            FollowToPlayer(Player)


    FollowToPlayer(Agent:agent)<suspends>:void=
        loop:
            if(Player := Agent.GetFortCharacter[]):
                FollowProp.MoveTo(Player.GetTransform(), 0.01)
These pieces of code make a Prop follow the player via Verse’s MoveTo, with the movement interpolated by the Control Rig.
They can be used in various applications – I mainly use them in pet systems that don’t rely on the NPC Spawner Device.
Control Rig is used to control the movement of objects. By using Control Rig, you can control an object’s movement on every tick—the smallest unit in the game.
For an extreme example, suppose the game runs at 60 fps and Verse can only execute TeleportTo 30 times per second; then, Control Rig could execute it 60 times.
Note: Control Rig is frame-rate dependent, so changes in fps will affect this.
You can create a Control Rig by right-clicking in the Content Drawer and selecting:
Animation → Control Rig → Control Rig
After creating it, double-click to edit the Control Rig.
Double-clicking opens an empty Control Rig.
Because Control Rig is node-based, it is easier to learn than Verse.
Even if you have a system that drives the movement, it won’t work unless something is moving.
First, prepare the system for the Control Rig by switching to the Rig Hierarchy in the lower left window.
Right-click inside the Rig Hierarchy and select:
New → New ControlAdd two controls.
Rename them to “MoveTo” and “Target” respectively.
Now that the preparation is done, let’s introduce the nodes used in this example.
You can bring up the search window by right-clicking on the canvas and typing to search for nodes.
Except for Interpolate, the functionality is straightforward.
The Interpolate node essentially works with an equation like (A + B) × T. For example, if A = 2, B = 0, and T = 0.5, the result is 1.
It may seem a bit abstract mathematically, but think of it as adjusting how much (percentage T) to change from value B toward A.
The logic to interpolate the MoveTo operation is as follows:
This is a very simple flow, similar to how Verse uses MoveTo for moving a Prop—but here, the execution speed of the Control Rig and the Interpolate node are key.
Following the logic, add the following nodes:
Next, adjust each node’s settings.
For GetTransform and SetTransform, you can choose which item from the rig hierarchy to reference by setting the “Item” property.
First, set every node’s Item → Type to Control.
Then, assign the names for each:
Now connect the nodes:
Next, try setting the Interpolate node’s T value to 0.05. Adjusting T controls how delayed the following motion is.
After setting it, click Compile (in the upper left) and then move the MoveTo control.
You should see that the Target follows MoveTo with a slight delay.
This setup is used to drive the MoveTo control via Verse and to parent the Target to the desired Prop.
Even though the Rig is implemented, it will not load in the map as-is.
To use it in a map, you must create a Blueprint that contains a Control Rig component.
From the Content Drawer, choose:
Blueprint Class → Building Prop
to create a new Blueprint.
Open the Blueprint and add a Control Rig Component from the top left.
Select the Control Rig component and, from “Control Rig Class,” choose the Control Rig you created earlier.
Return to the map, place the Blueprint, and then configure the User-Defined Elements of the Control Rig component.
Setting these allows you to parent the Controls (created in the Control Rig hierarchy) to other actors.
After clicking the “+” button to add a User-Defined Element, the following screen appears. I will explain only the items used in this example:
It might be hard to understand just by words, so let’s explain it while observing the actual behavior.
I prepared two building-prop Blueprints of spheres as placeholders.
Let’s configure the blue sphere (Sphere2) to follow the red sphere (Sphere).
In this example, set it up as follows:
Index 0:
Index 1:
Why does the movement become interpolated? Consider this example:
Suppose MoveTo moves from coordinate 0 to 10 and the T value is set to 0.05. Initially,
Target is at coordinate 0, but as time (ticks) passes, Target’s coordinate evolves as follows:
In this way, Target asymptotically approaches the coordinate of MoveTo.
The distance it can approach decreases exponentially, much like Zeno’s paradox of Achilles and the Tortoise.
Below is a simple example of Verse code. It is written so that the Prop always follows the player.
using { /Fortnite.com/Devices }
using { /Verse.org/Simulation }
using { /Fortnite.com/Characters }
using { /UnrealEngine.com/Temporary/Diagnostics }


PlayerProp := class(creative_device):

    @editable
    FollowProp : creative_prop = creative_prop{}

    OnBegin<override>()<suspends>:void=
        if(Player := GetPlayspace().GetPlayers()[0]):
            FollowToPlayer(Player)


    FollowToPlayer(Agent:agent)<suspends>:void=
        loop:
            if(Player := Agent.GetFortCharacter[]):
                FollowProp.MoveTo(Player.GetTransform(), 0.01)
Build the Verse code and place the device; you should then be able to define FollowProp.
In the Blueprint, select the Sphere (configured with MoveTo) for this field.
When you start the game, you’ll see that the blue sphere (controlled by Verse + Control Rig) smoothly follows the red sphere (controlled by Verse only).
Although using a regular MoveTo with, for example, a value of 0.33 might result in a generally smooth follow, employing Control Rig achieves an even more natural, seamless motion.
Since the Prop is currently a sphere—and for a pet system you’d want the pet to appear beside the player rather than overlapping—I made a few adjustments.
First, since a sphere is not very pet-like, I replaced it with a prop featuring a monkey’s head.
Next, place a new Sphere Blueprint, parent it to the red sphere, and offset it to the side. Then, hide both the red sphere and the newly placed sphere in-game.
After that, rotate the newly placed sphere so that the red sphere (which the monkey’s head should look toward) is properly aligned.
This completes a pet that follows alongside the player.