
March 22, 2025
Written by
始めに
今回は、UEFNの実験的な新機能 「シーングラフ」 について紹介します。シーングラフはまだ正式リリースされておらず、公開マップには使用できませんが、いずれ使えるようになるらしいです(ほんと?)
シーングラフを使うと、主に以下のようなことができるようになります。
これらの機能は、今までUEFNでは実現できなかったものです。特に、衝突検知が可能になると聞いて、私はシーングラフに強く興味を持ちました。しかし、現在はまだ ベータ版 のため、体系的なチュートリアルや解説がほとんどありません😭
そこで、本記事では シーングラフの基本的な使い方を、主にVerseを中心に解説 していきます。シーングラフに興味がある方や、UEFNでの新しい可能性を探りたい方は、ぜひ最後まで読んでみてください!シーングラフ楽しいよ!
最終結果
raycast_component
using { /Verse.org }
using { /Verse.org/Native }
using { /Verse.org/SceneGraph }
using { /Verse.org/Simulation }
using { /Fortnite.com/Devices }
using { /Fortnite.com/Characters }
using { /Verse.org/SpatialMath }
using { /UnrealEngine.com/Temporary/SpatialMath }
using { /UnrealEngine.com/Temporary/Diagnostics }
using { /Verse.org/SceneGraph/KeyframedMovement }
using { /Verse.org/Colors/NamedColors }
my_debug_draw := class(debug_draw_channel){}
raycast_component<public> := class<final_super>(component):
#デバッグ
DebugDraw : debug_draw = debug_draw{Channel := my_debug_draw}
OnSimulate<override>()<suspends>:void =
{}
#ヒットした場所の座標と法線を返す
SearchHit(Player : player):tuple(?(/Verse.org/SpatialMath:)vector3, ?(/Verse.org/SpatialMath:)vector3)=
var ReturnValue : tuple(?(/Verse.org/SpatialMath:)vector3, ?(/Verse.org/SpatialMath:)vector3) = (false, false)
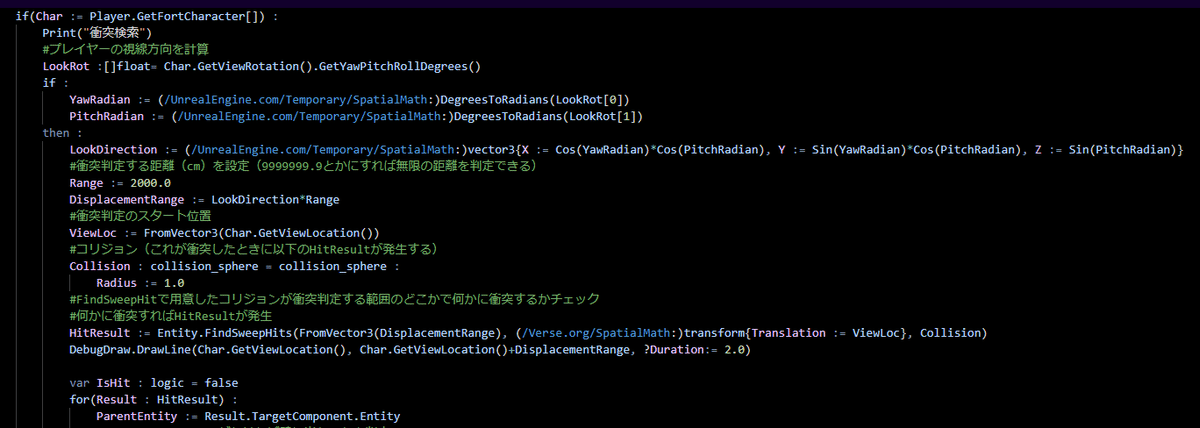
if(Char := Player.GetFortCharacter[]) :
Print("衝突検索")
#プレイヤーの視線方向を計算
LookRot :[]float= Char.GetViewRotation().GetYawPitchRollDegrees()
if :
YawRadian := (/UnrealEngine.com/Temporary/SpatialMath:)DegreesToRadians(LookRot[0])
PitchRadian := (/UnrealEngine.com/Temporary/SpatialMath:)DegreesToRadians(LookRot[1])
then :
LookDirection := (/UnrealEngine.com/Temporary/SpatialMath:)vector3{X := Cos(YawRadian)*Cos(PitchRadian), Y := Sin(YawRadian)*Cos(PitchRadian), Z := Sin(PitchRadian)}
#衝突判定する距離(cm)を設定(9999999.9とかにすれば無限の距離を判定できる)
Range := 2000.0
DisplacementRange := LookDirection*Range
#衝突判定のスタート位置
ViewLoc := FromVector3(Char.GetViewLocation())
#コリジョン(これが衝突したときに以下のHitResultが発生する)
Collision : collision_sphere = collision_sphere :
Radius := 1.0
#FindSweepHitで用意したコリジョンが衝突判定する範囲のどこかで何かに衝突するかチェック
#何かに衝突すればHitResultが発生
HitResult := Entity.FindSweepHits(FromVector3(DisplacementRange), (/Verse.org/SpatialMath:)transform{Translation := ViewLoc}, Collision)
DebugDraw.DrawLine(Char.GetViewLocation(), Char.GetViewLocation()+DisplacementRange, ?Duration:= 2.0)
var IsHit : logic = false
for(Result : HitResult) :
ParentEntity := Result.TargetComponent.Entity
#raycast_componentがなければ壁に当たったと判定
#壁用のコンポーネントを用意してそのコンポーネントを持ってるかどうかで判別してもいい
if(IsHit = false, not ParentEntity.GetComponent[raycast_component]) :
#衝突判定は1回(IsHit = falseのとき)のみ
set IsHit = true
HitPos := Result.ContactPosition
HitNormal := Result.ContactNormal
#返り値を設定
set ReturnValue = (option{HitPos}, option{HitNormal})
#デバッグ
DebugDraw.DrawSphere(FromVector3(HitPos), ?Radius := 10.0, ?Duration:= 2.0)
DebugDraw.DrawLine(FromVector3(HitPos), FromVector3(HitPos + HitNormal*100.0),?Color := Red, ?Duration:= 2.0)
Print("ヒット : {HitPos}")
return ReturnValue
portal_component
using { /Verse.org }
using { /Verse.org/Native }
using { /Verse.org/SceneGraph }
using { /Verse.org/Simulation }
using { /Fortnite.com/Devices }
using { /Fortnite.com/Characters }
using { /Verse.org/SpatialMath }
using { /UnrealEngine.com/Temporary/SpatialMath }

portal_component<public> := class<final_super>(component):

    @editable CondButton_Remocon : conditional_button_device = conditional_button_device{}
    @editable RemoconManager : signal_remote_manager_device = signal_remote_manager_device{}

    var IsTeleportPos : ?(/Verse.org/SpatialMath:)vector3 = false
    var PortalE : entity = entity{}

    OnSimulate<override>()<suspends>:void =
        set PortalE = entity{}
        RemoconManager.PrimarySignalEvent.Subscribe(OnSignal_Fire)
        RemoconManager.SecondarySignalEvent.Subscribe(OnSignal_Aim)

    OnSignal_Fire(Agent :agent):void=
        if :
            Char : fort_character = Agent.GetFortCharacter[]
            TeleportPos : (/Verse.org/SpatialMath:)vector3 = IsTeleportPos?
            Char.TeleportTo[FromVector3(TeleportPos), Char.GetTransform().Rotation]
        then :
            set IsTeleportPos = false
            RemovePortalVFX()
            Print("テレポート")
        else :
            Print("テレポート失敗")

    OnSignal_Aim(Agent :agent):void=
        if :
            Player : player = player[Agent]
            RayComp := Entity.GetComponent[raycast_component]
        then :
            Result := RayComp.SearchHit(Player)
            if :
                HitPos :(/Verse.org/SpatialMath:)vector3= Result(0)?
                HitNormal :(/Verse.org/SpatialMath:)vector3= Result(1)?
            then :
                TeleportPos := HitPos + HitNormal*100.0
                set IsTeleportPos = option{TeleportPos}
                AddPortalVFX(TeleportPos)
                Print("テレポート先登録")
            else :
                set IsTeleportPos = false
                RemovePortalVFX()
                Print("テレポート先なし")

    AddPortalVFX(SpawnPos : (/Verse.org/SpatialMath:)vector3):void=
        RemovePortalVFX()
        NewE := entity{}
        VFXComp : particle_system_component = Niagara.NS_Portal :
            Entity := NewE
            AutoPlay := true
        NewE.AddComponents(array{VFXComp})
        set PortalE = NewE
        if(Scene := Entity.GetSimulationEntity[]) :
            Scene.AddEntities(array{PortalE})
            PortalE.SetGlobalTransform((/Verse.org/SpatialMath:)transform{Translation := SpawnPos})

    RemovePortalVFX():void=
        PortalE.RemoveFromParent()
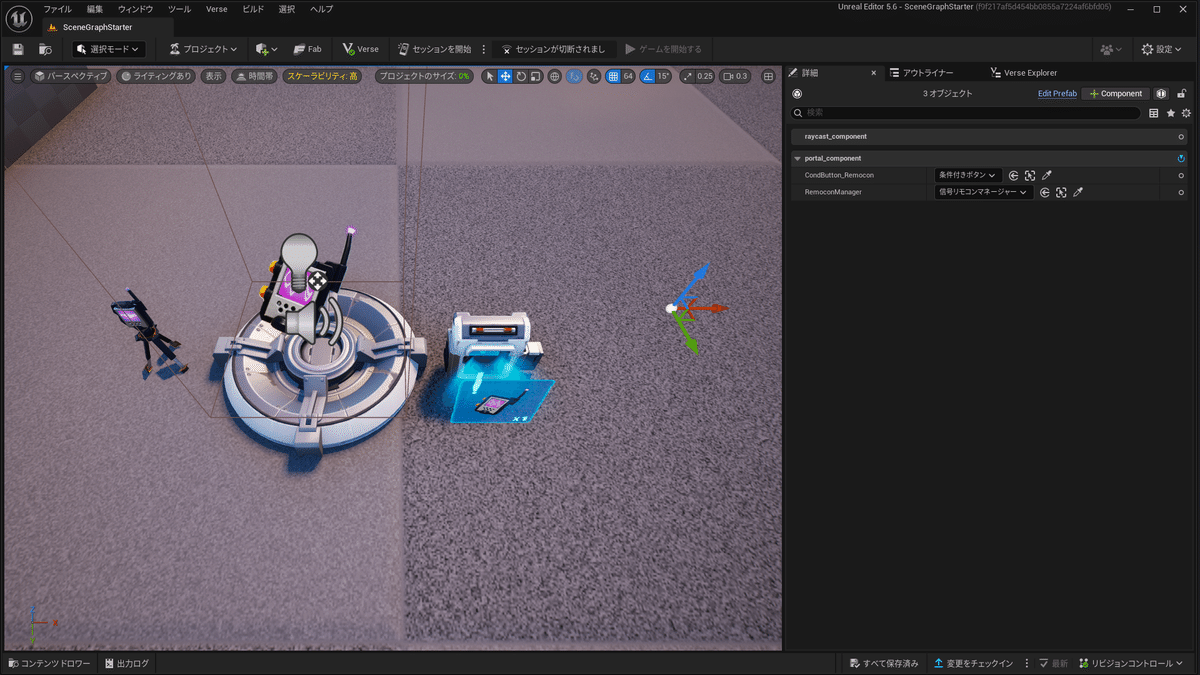
仕掛けとエンティティのセットアップ
シーングラフの基本
まずシーングラフ触ったことないよーって人も多いと思うので軽く基本を説明します!コンポーネントやエンティティなどの解説なので、分かってる人は飛ばしてもらってOKです
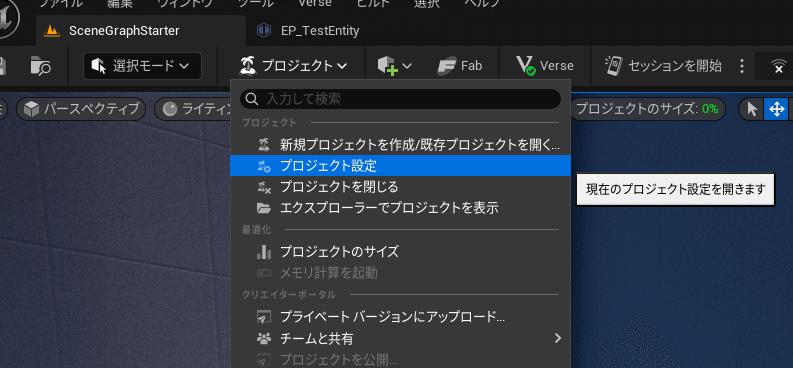
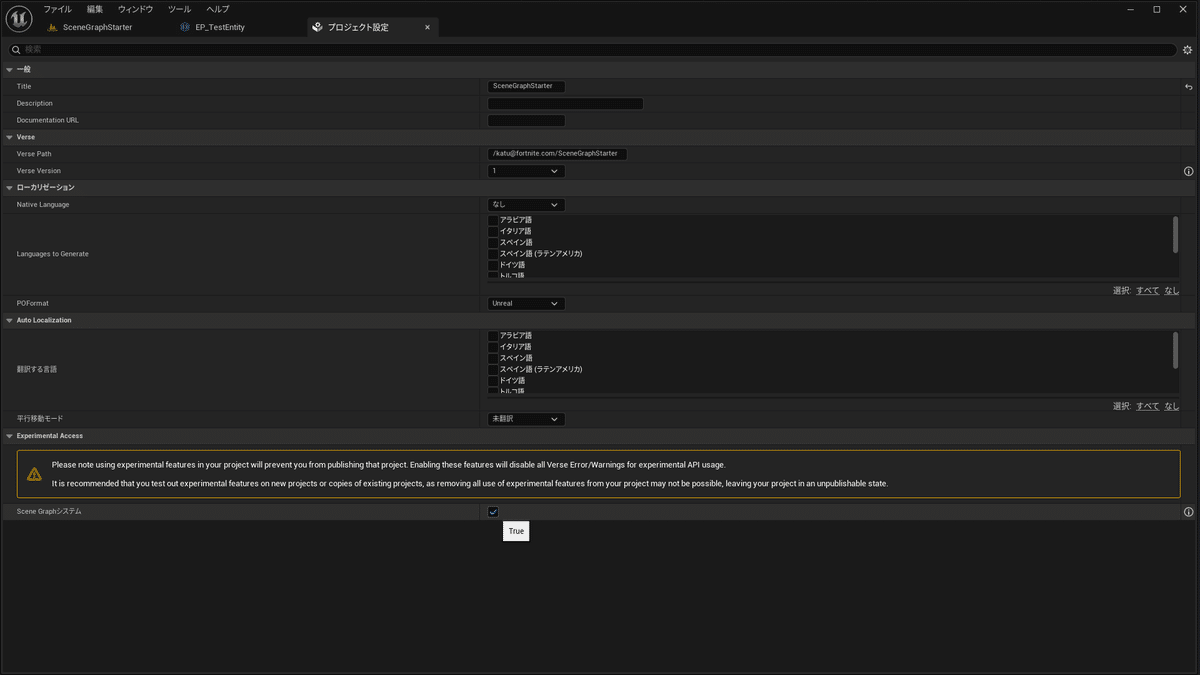
シーングラフは実験的機能なのでプロジェクトごとに有効にしないと使えません(執筆時点2025年3月21日)
プロジェクト
↓
プロジェクト設定
↓
SceneGraphシステムにチェックをつける
コンポーネント(部品)の集合体です。
エンティティを構成する1つ1つの要素のこと。
メッシュコンポーネント、パーティクルコンポーネント、
インタラクタブルコンポーネント、verseコンポーネントなど、、
そのエンティティで何ができるかは、どのようなコンポーネント(部品)がついているかで決まります
(エンティティ生成後にverseで後からコンポーネントを足すこともできる)
エンティティの集合体です。つまり、コンポーネントの集合体の集合体です。
(記事内で呼び方を「エンティティ」や「プレハブ」と省略することがあります)
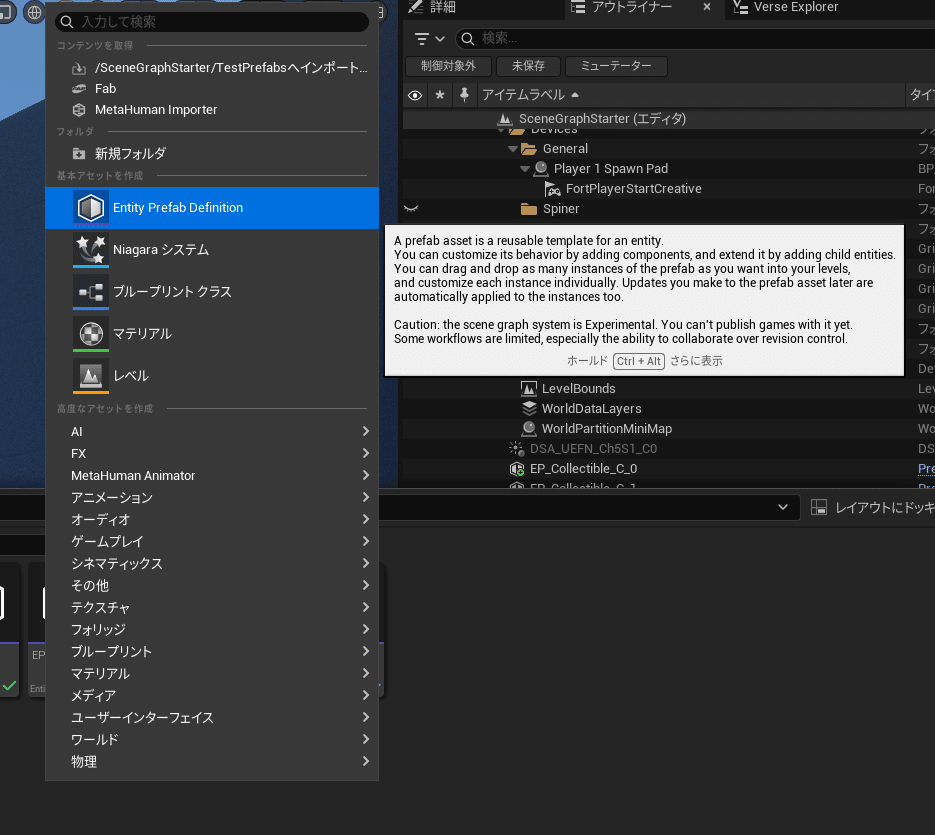
コンテンツドロワーの空いてるところで右クリック
↓
Entity Prefab Definition を作成
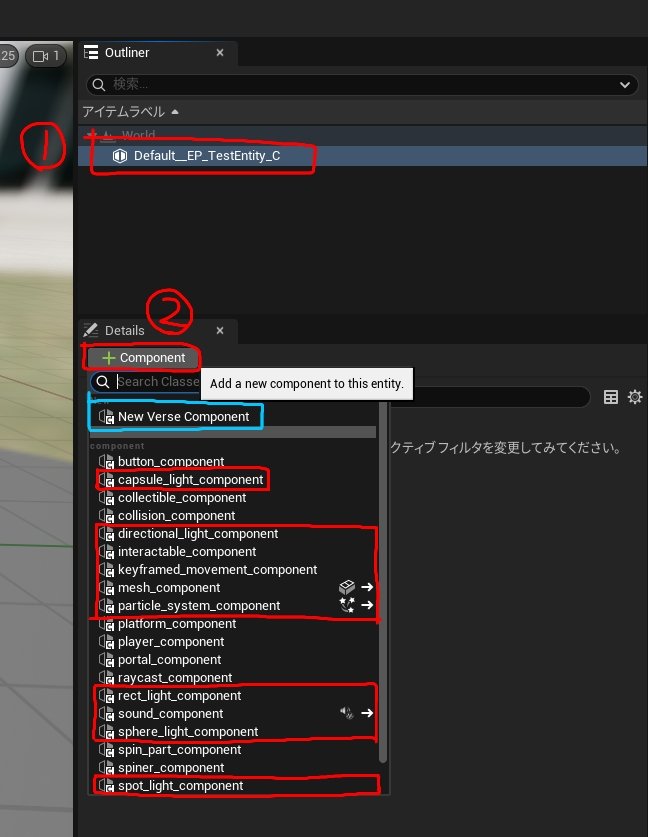
作ったプレハブを開く
↓
①を選択
↓
②を選択
するとドロップダウンメニューが表示され、どのコンポーネントを追加するか選べるようになります
※1つのエンティティにつき同じコンポーネントは1つまでしか追加できない
ので、メッシュコンポーネントを何個も置きたい場合はその分エンティティを追加してください
①にカーソルを合わせて右クリックでエンティティを追加できます
作ったプレハブをコンテンツドロワーからビューポートに
ドラッグ&ドロップする
アニメーション
試しにエンティティがその場で往復するようなコードを書きましょう!
しかしエンティティではMoveToが使えません(多分)
代わりにkeyframed_movement_componentというコンポーネントをエンティティに追加でき、これをverse側で操作することになります。
【全体の流れ】
詳しく手順を追ってみましょう!
エンティティプレハブを作り、
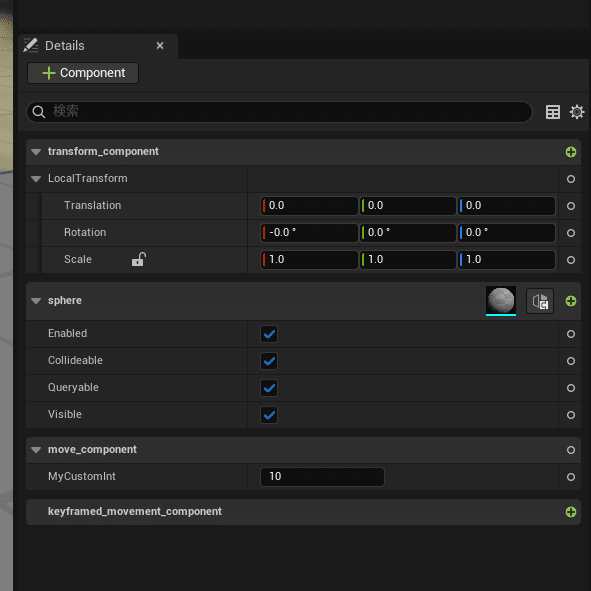
mesh_component
transform_component
keyframed_movement_component
を追加します
new verse component からmove_componentという名前のverseファイルを作成します
(このコンポーネントは自動でエンティティに追加されます)
verseファイルからmove_componentを開きます
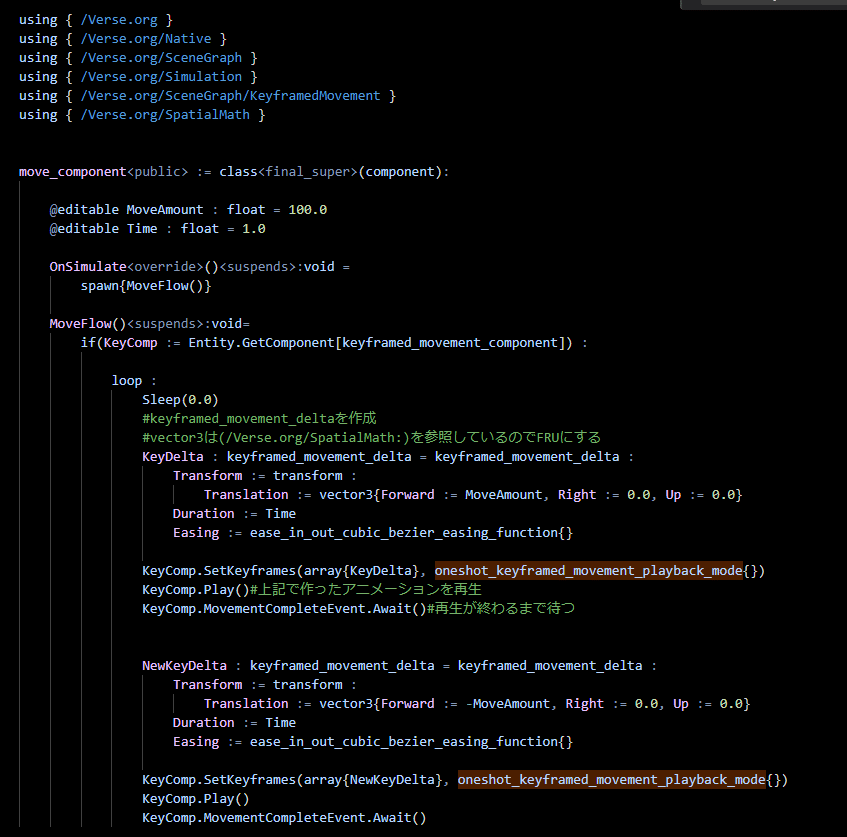
順番に解説します!
@editableでインスタンス編集可能な変数を追加できます
1.0の仕掛けなども通常のverseのように割り当てられます

このエンティティが生成された瞬間にOnSimulate()が呼ばれます
なのでここで関数をスポーンした場合、編集モードでも結果を確認できます
(ゲームをスタートしなくていい)
OnBeginSimulation~みたいなやつはいらないです

このコンポーネント自身の親エンティティは"Entity"と書いて取得できます
Entityはentity型で、
Entity.GetComponent[コンポーネントタイプ]
でエンティティがそのタイプのコンポーネントを持っているか確認できます
持ってなかったらfalse
今回はkeyframed_movement_componentを取得しています
keyframed_movement_componentには
Play()
SetKeyframes()
などのapiがあり、verseのAnimationControllerみたいな感じで使えます
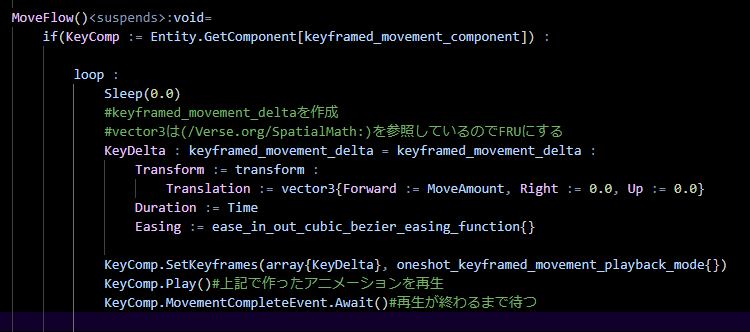

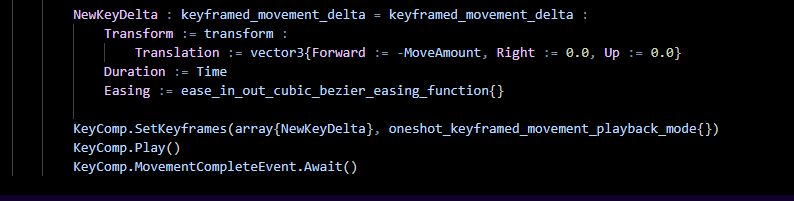
往復させたいので動かした分だけ戻します(-MoveAmount)
エンティティの生成、削除
この世界にはルートエンティティというものが存在していて、
そのエンティティに親子付けするみたいなノリで新しいエンティティを生成することができます
試しに新しいプレハブで
new verse file→spawner_component
という名前のverseファイルを作ります
順番に解説します!
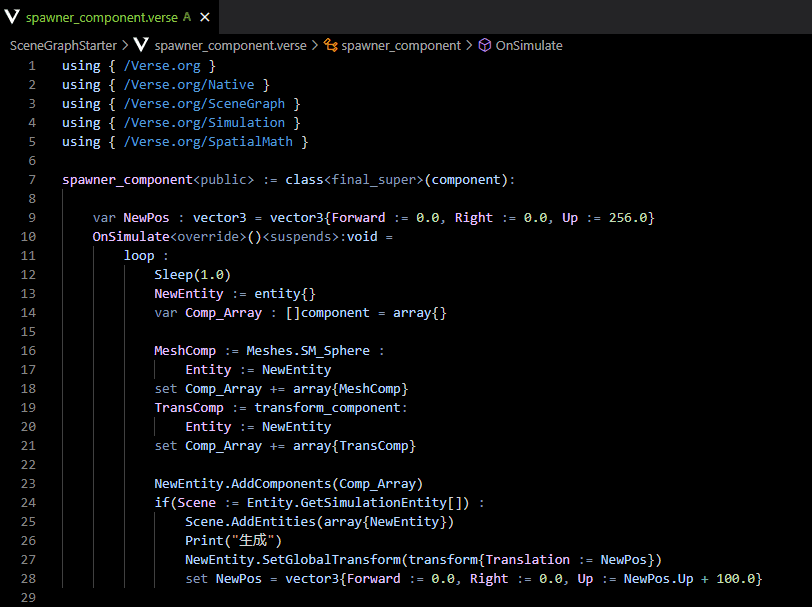
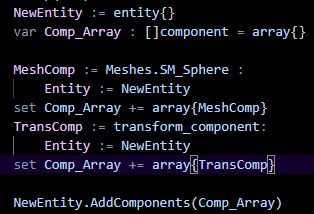
生成したいエンティティを準備します。
追加したいコンポーネントを配列にしてAddComponentsします
このセクションの最初に触れたルートエンティティを取得しています
Scene.AddEntities()で先ほど用意したエンティティを追加します
※引数にentity型の配列を要求されるのでarray{entity}などを
いれてください
これでどんどん上に向かってエンティティが生成されるようになりました!

消したいエンティティ.RemoveFromParent()
で世界からそのエンティティを消せます

マテリアルの割り当て、パラメーター変更
マテリアルの割り当ては少し特殊です
そのメッシュのマテリアルスロットを指定してマテリアルを割り当てる
ということをしないといけないため、
通常のmseh_component(アセットが特定できない)は
マテリアルを変更できません(多分)
仕方がないのでエンティティを生成して
(もしくは現在のエンティティにmesh_componentを追加して)
そのmesh_componentならアセットが特定できているので
マテリアルを割り当てられます!
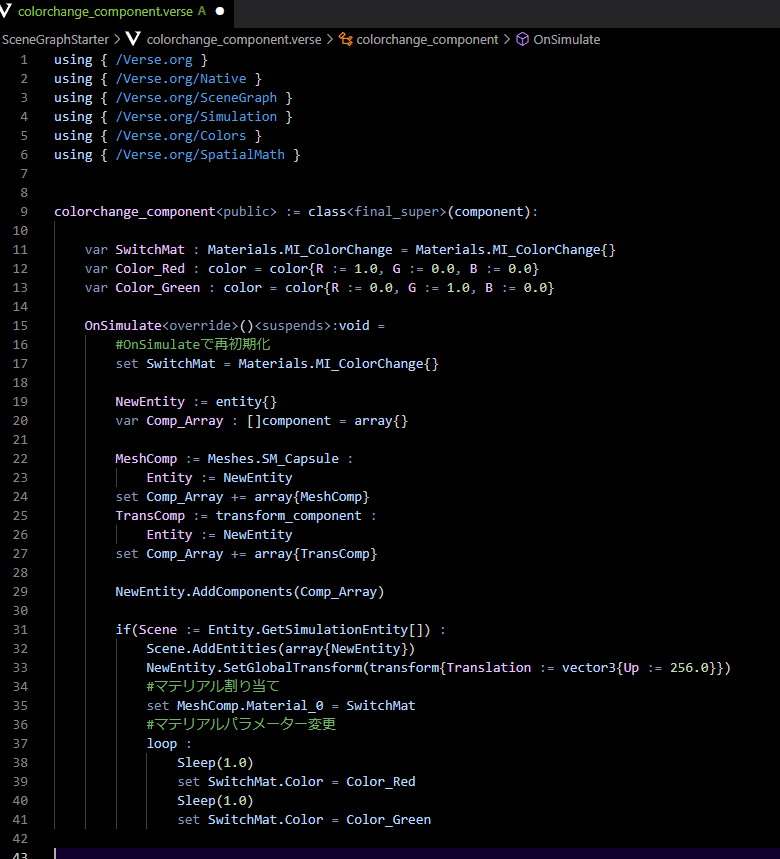
また、マテリアル型やエンティティ型の変数を色んな関数で使いたい場合、
OnSimulate()で一度再初期化しないと上手く動きません(なんで?)

まぁ一度マテリアルを割り当てた後はマテリアル変数の操作だけで
パラメーター変更できるので、大丈夫っちゃ大丈夫なんですが。。
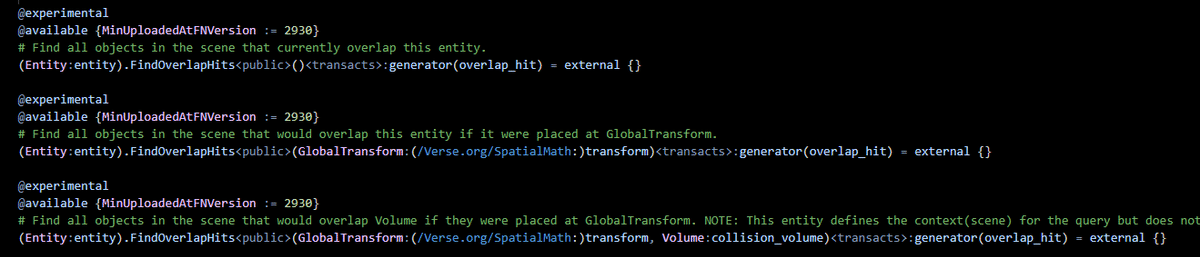
衝突を判定
衝突を判定するapiは4つあります
今そのエンティティが他のエンティティに衝突しているか
そのエンティティから〇〇の範囲(コリジョン)に他のエンティティがあるか
指定した開始位置から〇〇の距離内(Displacement)に他のエンティティがあるか
※FindSweepHitsは自身のメッシュコンポーネントをその直線上でスライドさせて他のエンティティに当たるか調べる~というような感覚なので、コリジョンを引数にするかメッシュコンポーネントを追加しておかないと機能しません
※つまりメッシュコンポーネント(もしくはコリジョン)の当たり判定をとても小さくすれば、
疑似的にライントレースのような挙動にできます
※Displacementには方向ベクトルだけでなく、調べる長さも含めなければいけません
(Displacement = 方向ベクトル*長さ)
そのメッシュコンポーネントに他のエンティティが重なったときに
イベントが発生します(listenable)
そのメッシュコンポーネントから他のエンティティが出たときに
イベントが発生します(listenable)


例としてプレイヤーの視線方向2000cmで衝突を判定するコードを
載せておきます
1つのverseファイル内で
の両方を使っている場合、verseくんはどっちを使えば分からなくなっちゃうので図のように明示してあげましょう
(応用)テレポートシステムを作ろう
ここまでを踏まえてテレポートシステムを作ってみましょう!
要件:
・信号リモコン第2ボタン(照準)を押すと視線の先(2000cm以内)
にポータルを生成
・信号リモコン第1ボタン(射撃)を押すと生成済みのポータルにテレポート
・生成したポータルはオブジェクトにめり込まない
(動くプラットフォームなどは考えないものとする)
・新しいポータルを生成したら古いポータルは消える
一度使ったポータルは消える
コードと仕掛けの全体図はこの記事の最終結果に記載しておきます!
Introduction
In this article, I’ll introduce UEFN’s experimental new feature, Scene Graph. Scene Graph is not yet officially released and cannot be used in public maps, but it’s expected to become available eventually (really?).
With Scene Graph, you can:
These features were previously impossible in UEFN. In particular, hearing that collision detection would become possible sparked my strong interest in Scene Graph. However, since it’s still in beta, there are almost no comprehensive tutorials or guides 😭
Therefore, in this article I’ll explain the basic usage of Scene Graph, focusing primarily on Verse. If you’re curious about Scene Graph or want to explore new possibilities in UEFN, please read through to the end — Scene Graph is fun!
Final Result
raycast_component
using { /Verse.org }
using { /Verse.org/Native }
using { /Verse.org/SceneGraph }
using { /Verse.org/Simulation }
using { /Fortnite.com/Devices }
using { /Fortnite.com/Characters }
using { /Verse.org/SpatialMath }
using { /UnrealEngine.com/Temporary/SpatialMath }
using { /UnrealEngine.com/Temporary/Diagnostics }
using { /Verse.org/SceneGraph/KeyframedMovement }
using { /Verse.org/Colors/NamedColors }


my_debug_draw := class(debug_draw_channel){}

raycast_component<public> := class<final_super>(component):

    # Debug
    DebugDraw : debug_draw = debug_draw{Channel := my_debug_draw}

    OnSimulate<override>()<suspends>:void =
        {}

    # Returns hit location and normal
    SearchHit(Player : player):tuple(?(/Verse.org/SpatialMath:)vector3, ?(/Verse.org/SpatialMath:)vector3)=
        var ReturnValue : tuple(?(/Verse.org/SpatialMath:)vector3, ?(/Verse.org/SpatialMath:)vector3) = (false, false)

        if(Char := Player.GetFortCharacter[]) :
            Print("Collision search")
            # Calculate player's view direction
            LookRot :[]float= Char.GetViewRotation().GetYawPitchRollDegrees()
            if :
                YawRadian := (/UnrealEngine.com/Temporary/SpatialMath:)DegreesToRadians(LookRot[0])
                PitchRadian := (/UnrealEngine.com/Temporary/SpatialMath:)DegreesToRadians(LookRot[1])
            then :
                LookDirection := (/UnrealEngine.com/Temporary/SpatialMath:)vector3{X := Cos(YawRadian)*Cos(PitchRadian), Y := Sin(YawRadian)*Cos(PitchRadian), Z := Sin(PitchRadian)}
                # Set collision check distance (cm; use very large value for infinite range)
                Range := 2000.0
                DisplacementRange := LookDirection*Range
                # Start position for collision check
                ViewLoc := FromVector3(Char.GetViewLocation())
                # Collision (HitResult occurs when this collides)
                Collision : collision_sphere = collision_sphere :
                    Radius := 1.0
                # Check if sweep collision hits anything
                # HitResult occurs if collision detected
                HitResult := Entity.FindSweepHits(FromVector3(DisplacementRange), (/Verse.org/SpatialMath:)transform{Translation := ViewLoc}, Collision)
                DebugDraw.DrawLine(Char.GetViewLocation(), Char.GetViewLocation()+DisplacementRange, ?Duration:= 2.0)

                var IsHit : logic = false
                for(Result : HitResult) :
                    ParentEntity := Result.TargetComponent.Entity
                    # Treat as wall hit if no raycast_component
                    # Optionally, differentiate walls by using a specific component
                    if(IsHit = false, not ParentEntity.GetComponent[raycast_component]) :
                        # Perform hit detection only once (when IsHit is false)
                        set IsHit = true
                        HitPos := Result.ContactPosition
                        HitNormal := Result.ContactNormal
                        # Set return value
                        set ReturnValue = (option{HitPos}, option{HitNormal})
                        # Debug
                        DebugDraw.DrawSphere(FromVector3(HitPos), ?Radius := 10.0, ?Duration:= 2.0)
                        DebugDraw.DrawLine(FromVector3(HitPos), FromVector3(HitPos + HitNormal*100.0),?Color := Red,  ?Duration:= 2.0)
                        Print("Hit : {HitPos}")

        return ReturnValue
portal_component
using { /Verse.org }
using { /Verse.org/Native }
using { /Verse.org/SceneGraph }
using { /Verse.org/Simulation }
using { /Fortnite.com/Devices }
using { /Fortnite.com/Characters }
using { /Verse.org/SpatialMath }
using { /UnrealEngine.com/Temporary/SpatialMath }

portal_component<public> := class<final_super>(component):

    @editable CondButton_Remocon : conditional_button_device = conditional_button_device{}
    @editable RemoconManager : signal_remote_manager_device = signal_remote_manager_device{}

    var IsTeleportPos : ?(/Verse.org/SpatialMath:)vector3 = false
    var PortalE : entity = entity{}

    OnSimulate<override>()<suspends>:void =
        set PortalE = entity{}
        RemoconManager.PrimarySignalEvent.Subscribe(OnSignal_Fire)
        RemoconManager.SecondarySignalEvent.Subscribe(OnSignal_Aim)

    OnSignal_Fire(Agent :agent):void=
        if :
            Char : fort_character = Agent.GetFortCharacter[]
            TeleportPos : (/Verse.org/SpatialMath:)vector3 = IsTeleportPos?
            Char.TeleportTo[FromVector3(TeleportPos), Char.GetTransform().Rotation]
        then :
            set IsTeleportPos = false
            RemovePortalVFX()
            Print("Teleport")
        else :
            Print("Teleport failed")

    OnSignal_Aim(Agent :agent):void=
        if :
            Player : player = player[Agent]
            RayComp := Entity.GetComponent[raycast_component]
        then :
            Result := RayComp.SearchHit(Player)
            if :
                HitPos :(/Verse.org/SpatialMath:)vector3= Result(0)?
                HitNormal :(/Verse.org/SpatialMath:)vector3= Result(1)?
            then :
                TeleportPos := HitPos + HitNormal*100.0
                set IsTeleportPos = option{TeleportPos}
                AddPortalVFX(TeleportPos)
                Print("Teleport destination registered")
            else :
                set IsTeleportPos = false
                RemovePortalVFX()
                Print("No teleport destination")

    AddPortalVFX(SpawnPos : (/Verse.org/SpatialMath:)vector3):void=
        RemovePortalVFX()
        NewE := entity{}
        VFXComp : particle_system_component = Niagara.NS_Portal :
            Entity := NewE
            AutoPlay := true
        NewE.AddComponents(array{VFXComp})
        set PortalE = NewE
        if(Scene := Entity.GetSimulationEntity[]) :
            Scene.AddEntities(array{PortalE})
            PortalE.SetGlobalTransform((/Verse.org/SpatialMath:)transform{Translation := SpawnPos})

    RemovePortalVFX():void=
        PortalE.RemoveFromParent()
Setup of Triggers and Entities
signal_remote_manager_device)conditional_button_device)raycast_component and portal_component attached)
Scene Graph Basics
Many people haven’t tried Scene Graph before, so here’s a quick overview of the core concepts. Feel free to skip if you’re already familiar.
Enabling Scene Graph
Scene Graph is an experimental feature, so you must enable it on a per-project basis (as of March 21, 2025):
Right‑click in an empty area of the Content Drawer
↓
select Entity Prefab Definition
Open the prefab you created
↓
Select ①
↓
Select ②
A dropdown menu will appear, allowing you to choose which component to add.
Drag and drop the prefab from the Content Drawer into the viewport.
Animation
Let’s try writing some simple code to make an entity move back and forth in place.
MoveTo with entities.keyframed_movement_component to the entity, which you'll control from the Verse side.keyframed_movement_component and a custom Verse component to the entity.keyframed_movement_component, create the animation, and play it.Let’s Go Through the Steps in Detail
First, create an entity prefab and add the following components:
mesh_componenttransform_componentkeyframed_movement_componentNext, create a new Verse file from the New Verse Component menu and name it move_component.
(This component will be automatically added to the entity.)
Now, open move_component from the Verse file.
Let’s go through it step by step!
With @editable, you can add variables that can be edited per instance.
Just like in standard Verse (such as in UEFN 1.0), you can assign values like devices or triggers in the usual way.
The OnSimulate() function is called the moment this entity is spawned.
So, if you call a function from here, you can see the result even while in Edit mode — no need to start the game.
There’s no need for something like OnBeginSimulation().
You can access the parent entity of this component by using Entity.Entity is of type entity, and you can check whether it has a specific component by using:
Entity.GetComponent[ComponentType]
If the entity doesn’t have that component, it returns false.
In this case, we're retrieving the keyframed_movement_component.
This component provides APIs like Play() and SetKeyframes(), and you can use it similarly to an AnimationController in Verse.
Since we want the entity to move back and forth, we simply move it forward and then move it back by the same amount (using -MoveAmount).
Spawning and Destroying Entities
In this world, there’s something called the root entity.New entities can be spawned by attaching them to this root entity — kind of like setting up a parent-child relationship.
To try it out, create a new prefab, then go to New Verse File and name it spawner_component.
Let’s go through it step by step!
This is where we prepare the entity we want to spawn.We create an array of components we want to add, and use AddComponents to attach them to the entity.
Here, we're getting the root entity that we mentioned at the beginning of this section.
Using Scene.AddEntities(), we add the entity we prepared earlier.
Note: AddEntities expects an array of entity types as its argument, so make sure to pass something like array{entity}.
With this, entities will now keep spawning upward one after another!
You can remove an entity from the world by calling .RemoveFromParent() on the entity you want to delete.
Assigning Materials and Changing Parameters
Assigning materials works a bit differently.
You need to specify the material slot on the mesh where the material should be applied.
Because of this, you likely can’t change materials on a regular mesh_component— since it doesn’t reference a specific asset.
So instead, we can spawn a new entity
—or add a mesh_component to the current entity
—because in that case, the mesh_component references a specific asset,which means we can assign a material to it!
Also, if you want to use variables like material or entity types across multiple functions,
you’ll need to reinitialize them once inside OnSimulate()— otherwise, things might not work as expected.(Why? Honestly, not sure either.)
Well, once you’ve assigned the material, you can modify its parameters just by working with the material variable itself
—so technically, it’s fine after that… but still, yeah.
Collision Detection
There are four main APIs you can use for collision detection:
Checks if the entity is currently overlapping with any other entities,
or if any entities exist within a certain collision range from the entity.
Checks if there are any entities within a specified distance (Displacement) from a starting position.
⚠️ FindSweepHits works by virtually sliding the entity’s mesh component along a straight path to see if it hits anything.
That means you need to either pass in a collision shape as an argument, or make sure the entity has a mesh component — otherwise, it won't work.
✔️ If you make the mesh component (or collision shape) very small,
you can use this function like a pseudo line trace.
🧭 Displacement must include both direction and distance —
in other words, Displacement = DirectionVector * Distance.
A listenable event that fires when another entity overlaps with this mesh component.
A listenable event that fires when another entity leaves this mesh component’s collision area.
As an example, here’s some code that performs a collision check 2000cm in the direction the player is looking:
If you're using both of the following imports in the same Verse file:
Verse might get confused about which one to use.
To fix that, make sure to specify clearly which version you're referencing — like in the example below.
[Advanced] Let’s Build a Teleport System
Based on everything we’ve covered so far, let’s try creating a simple teleport system!
Requirements:
The full code and setup will be provided at the end of this article!